Servos
Some information taken from REV Robotics Documentation
Servos are a type of motor that, unlike motors, can be controlled to move to a specific position. The servos used for robotics are called "dual-mode" servos. These have the ability to rotate continuously like a motor, or move to a specific angle like a servo. Unlike motors, they accept an input signal between 0 and 1, where 0 is the minimum position and 1 is the maximum position. The center of the servo is at 0.5.
To use a servo, see the Hardware page.
Servo Programmers
The servo programmer (made by REV) can be used to modify properties of the servo, such as the minimum and maximum position and the mode.
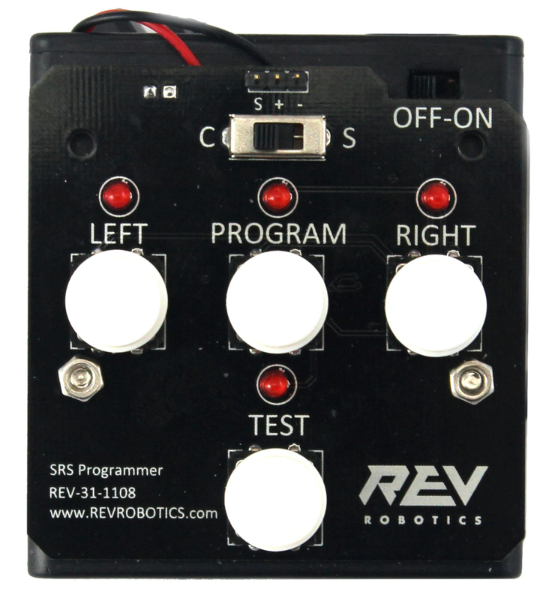
To use the servo programmer, connect the servo to the top port of the programmer. The red wire corresponds to "+" and the black wire corresponds to "-". The white wire corresponds to the signal wire. (Note that the servo cable might have an orange signal wire).
Switching servo modes
Follow the steps below to switch a servo between Continuous Mode and Servo Mode.
- Connect the servo to the programmer.
- Turn on the programmer.
- Slide the mode switch to the desired mode: C - Continuous, S - Servo.
- Press and release the PROGRAM button once.
- The PROGRAM LED should blink and then stay solid indicating success.
Setting Angular Limits
Follow the steps below to set the angular limits for the Servo Mode.
- Start with the servo already configured in Servo Mode (see above section for more info)
- Connect the SRS to the programmer.
- Turn on the programmer.
- Slide the mode switch to S position.
- This step is optional, but recommended to make it easier to see the valid limit ranges. Please refer to the SRS User's Manual for more information about the valid limit ranges.
- Press and release the TEST button twice to enter Manual Test Mode (see Test Modes for more information).
- Press the PROGRAM button to center the servo at 0°.
- Press and release the TEST button once to leave the test mode.
- Manually rotate the servo to the desired left limit position.
- Press and release the LEFT button. The LEFT LED will illuminate if the position is valid.
- Manually rotate the servo to the desired right limit position.
- Press and release the RIGHT button. The RIGHT LED will illuminate if the position is valid.
- After both limits are set, press and release the PROGRAM button. The PROGRAM LED should blink and then stay solid indicating success.
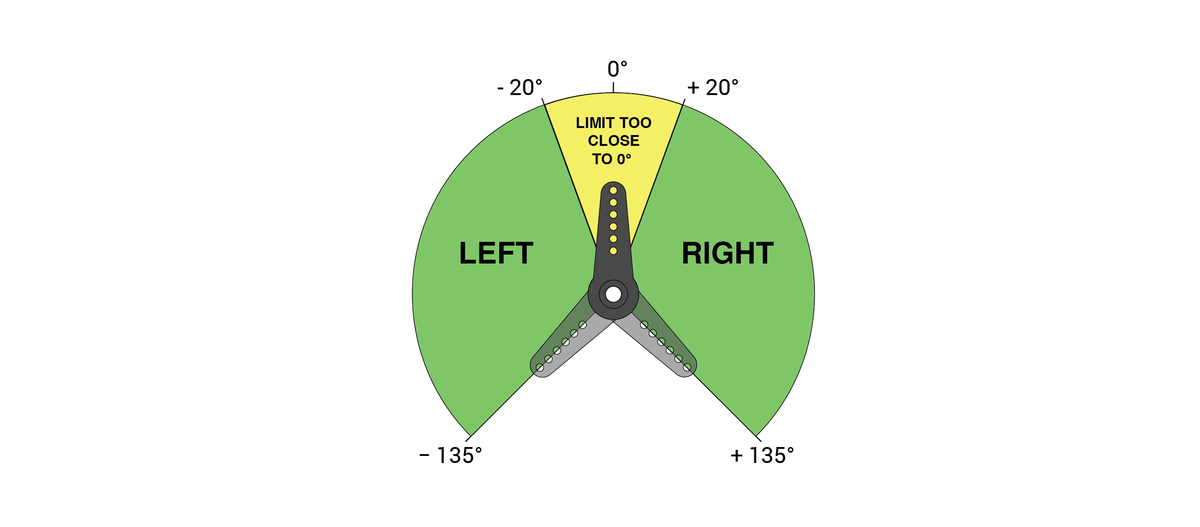
The limits on the servo must be chosen carefully. The maximum rotation of the servo is 135 degrees in each direction. The left or right limit also cannot be set to a value that is within 20 degrees of the center.
Using Servos in Continuous Mode
Using servos in continuous mode is similar to using motors. The only difference is that the power value is between 0 and 1.0 instead of -1.0 and 1.0. A power of 0.5 will make the servo stop, a power of 0.0 will make the servo rotate backwards, and a power of 1.0 will make the servo rotate forwards.
Because all our gamepad inputs are between -1.0 and 1.0, you will need to convert the input to the correct range. We can express this with a simple math equation:
Where
In Kotlin, this can be written as:
val output = (input + 1) / 2For more info, see the Hardware page.